

Crib sheet for digital test
A printable PDF of the digital administration instructions is available in the Downloads section.
Please read the information in the ‘Getting Started’ section of Testwise help.
Prepare the material
- Carry out the Setup Check to ensure the smooth running of the test session.
- Check that the computers or laptops are fully charged and working for each student.
- Check that headphones and mouse are in good working order for each student.
- Calculators are not allowed.
Prepare the test environment
- Ensure a quiet, comfortable and well-lit room.
- Set up the computers in advance.
- Try to prevent interruptions, for example from announcements or visitors.
- Seat the students so that they are comfortable and they cannot easily copy from one another.
- Place a ‘Testing – Do Not Disturb’ sign on the door.
- Allow enough time for the testing session, including settling time for students.
Prepare the students
- Make the students aware that they are taking a test, and that the usual expectations of behaviour during a test session will be in place.
- Introduce the test with the following information, adapted as required:
‘Today you are going to take a science test. All instructions are given through the voiceover and you should listen carefully to make sure you understand what you have to do. (All directions, examples and practice items are part of the test and are delivered via the audio.)
This test will take you about an hour. You must not talk to each other.
If you have any questions during the test, you should put up your hand and wait for me/someone to come to you. I cannot help you to answer any questions but I can read words if you need me to. [You should not explain word meanings.]
It doesn’t matter if you find the questions difficult, just try your best. If you cannot answer a question, you should carry on with the other questions and come back to the difficult ones if there is time. Do not copy anybody else’s work. When you have finished go back and check your answers. Do you have any questions?
First we will try some practice questions, so listen carefully. Stop when you have finished the practice questions.
Click on the ‘Take Now’ button.’
Starting the test
At the beginning of the first part of PTS there is a series of examples to show the students how to answer the different types of questions. Here is the first example:
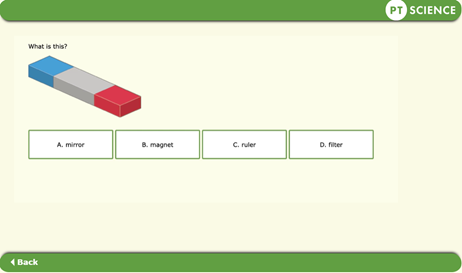
Students can view the examples at their own pace and go back to see again what they need to do. When testing younger students (for example those taking PTS 8), you may want to oversee this part of the process.
During the test
- Students use the ‘Next’ and ‘Back’ buttons to navigate through the questions.
- Students must work in silence.
- Teachers should walk around during the test to check that students are progressing appropriately and that they are not looking at each other’s work or talking.
- Teachers should also check that the students have not rushed through any part of the test without attempting to answer each question.
Ending the test
At the end of the test, the following screen will appear:
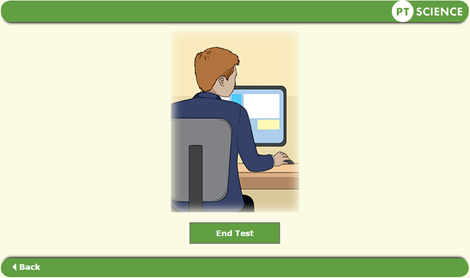
Once students have ended the test, their results will be saved automatically. Students must not try to exit the test or close the screen by clicking on the cross at the top right-hand corner as this will cause results to be lost.